A Deep Dive Into the NestJS Injection Scope
How can we use it?
 Santosh Yadav Jan 10, 2020 3 min read
In my previous piece, we discussed NestJS services. In this piece, we’ll look at the injection scope.
Provider Scope
There are three modes to define the scope. We can either define the scope properties on the service level or module level. It can be used with a class-based and nonclass-based service and with controllers. The three modes are:
DEFAULTREQUESTTRANSIENT
The syntax for defining the scope is as below:
For service
@Injectable({ scope: Scope.TRANSIENT})For module
providers : [{ provide : PRODUCT, useValue: Product_Token, scope : Scope.REQUEST}]For controllers
@Controller({ path: 'product', scope: Scope.REQUEST })Now that we’e aware of how to use the scope property, let’s see each one of them in detail.
The Default Scope
You don’t need to define the scope to DEFAULT. When you don’t define the property, it’s set to DEFAULT, and the instances will be singleton (which means once the connection is established, the same instance will be used for all requests).
For most of cases, like database connection and logger services, singleton is the best option to use.
In the below example, showing a LoggerService in singleton, any controller/service using LoggerService will get the same instance.
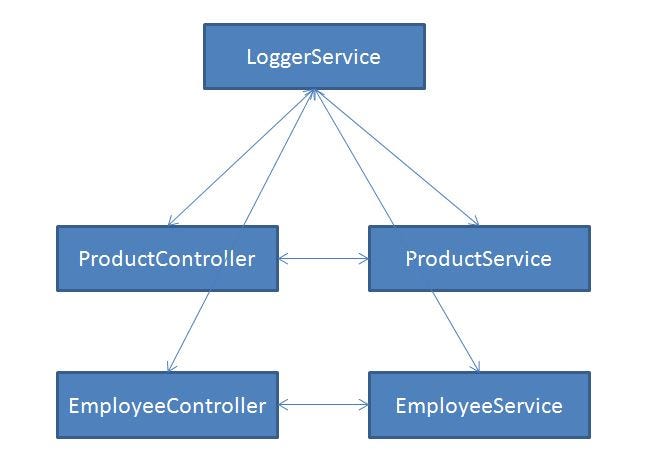
DEFAULT scope
The Request Scope
In a REQUEST scope, the same instance will be shared for the same request.
You can see in the below diagram that LoggerService is shared for each request. The GetProduct action and ProductService will share the same instance, and if we try to access an AddProduct action, another instance will be created.
A real-time use case is if we want to share the Request object between the controller and the service for each request.
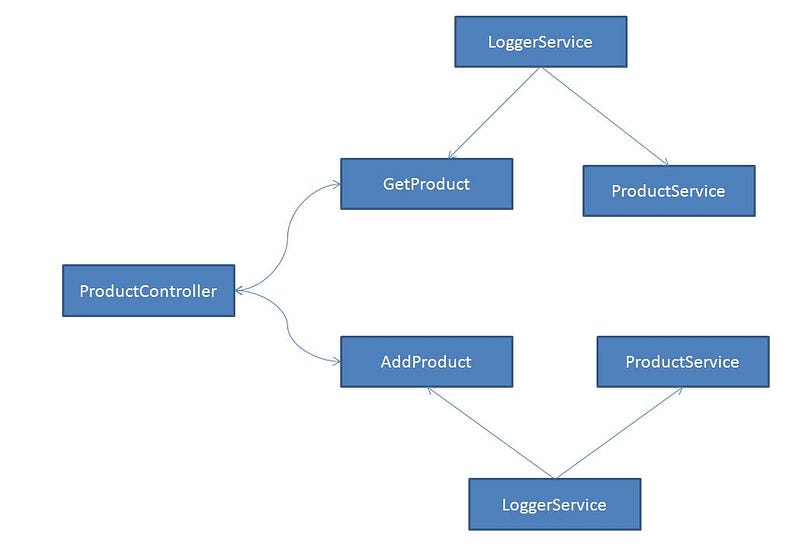
REQUEST scope
The Transient Scope
In a TRANSIENT scope, a new instance will be created for every controller or service where we’re using it. The below diagram shows the same scenario where the scope is changed to TRANSIENT. Here a new instance of LoggerService is created for every action and service.
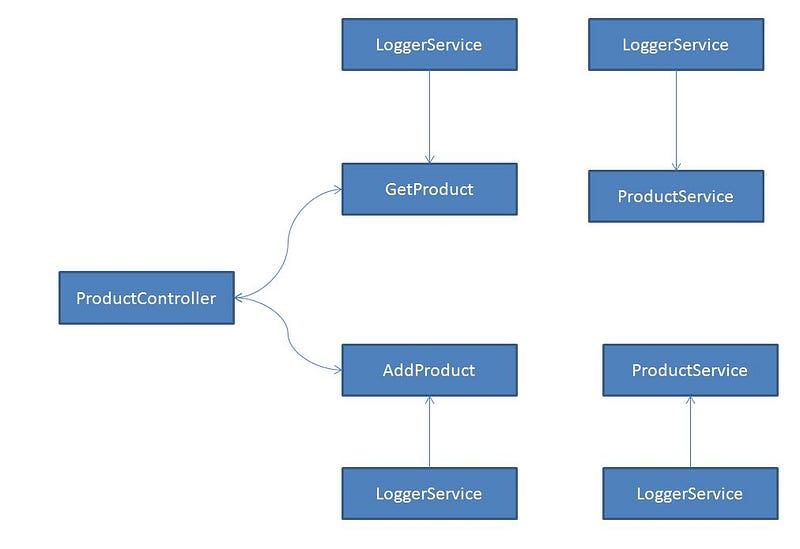
TRANSIENT Scope
Code
Create a new LoggerService using the below command:
nest generate service Loggerimport { Injectable, Scope } from '@nestjs/common';
@Injectable({ scope: Scope.REQUEST})export class LoggerService { constructor() { console.log('new instance of request') }}Next, inject the service into the ProductController and the ProductService.
import { LoggerService } from '../logger/logger.service';
@Controller('product')export class ProductController {
    constructor(private productService: ProductService,        private loggerService: LoggerService) { }}
import { LoggerService } from '../logger/logger.service';
@Injectable()export class ProductService {
constructor(@Inject(PRODUCT) product: Product, private loggerService: LoggerService) { }}Next, run the application. Change the scope, and see how the scope gets changed in action.
Conclusion
Though it’s OK to have a singleton instance, using REQUEST and TRANSIENT scopes can impact the performance, as per docs.
But there may be scenarios where we need to change the scope, but until you’re sure, just use the DEFAULT scope.